Wednesday, April 29, 2015

To Go To Bimini, You Need a Bimini

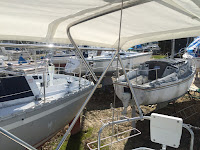
Figure 79 - Pius (aka Paul Newman) and Dr. Bill under the improvised bimini
One of the great benefits of our Yacht Club is that we have members who are talented in just about any aspect of old boat maintenance and repair.  One of these is a guy called Rob.  Rob is the brother of Andy who brought the Beast to life.  Rob's gifts are in canvass, especially covers and biminis.

Last year, just prior to our Fall Down the Bay Cruise, I built a very sturdy homemade bimini made of extra thick walled PVC pipes, a powerboat bimini canvas and stainless nuts and bolts.  It did the job for the trip but made the Constance Marie look like a malnourished floating duck.


Fast forward to earlier this year.  After meeting and negotiating price with Rob in determining whether we should design a 5,6 or 7 foot bimini and what color, I re-directed my efforts to other maintenance issues.  Rob delivered a masterpiece. See for yourself.


Figures 80 -  86

There are several features of this custom bimini that I love.  First, it covers the entire cockpit, second it fits like a glove accommodating my 6.2" height (even with my cap on), third it has a stainless steel crossbars with snap link requiring no fore and aft support straps, fourth, it has quick release pins in the aft support when folding it up, fifth, it has a large see through panel to view the tell tails and windvane and sixth, it has a very cool zippered cover when rolled up.


Monday, April 27, 2015

From Dungarees to Mainsails

Figure 78 - It will be a great harvest
The spring rain is falling softly this evening. Most of the vegetable garden is planted. I examined the mainsail more closely and found that I had half a dozen areas along the leech side that required at least six inches each sewing repairs. I learned to sew as a young teenager in the sixties. We were leading up to Woodstock but it was around 1966 when I decided to patch my first set of jeans. At school it became cool to patch your torn jeans. So that is how it started. Never did migrate to a sewing machine. Adhering to my old school methods in the resurrection of the Constance Marie, I spent the next four nights mending the original Hunter 27 mainsail.  I think I did a good job and believe that I might have extended the life of it by 2-3 years.

Saturday, April 18, 2015

Rain Rain Go Away, Actually It's Been Wetter in My Bilge

April is turning our to be ok. Getting lots of stuff done.  Finished the portals (previous blog), sanded the teak floors, primed and painted the interior, AGAIN!  Painted the top-side non-skid areas,  put on a custom-built 6 foot artic white bimini, arranged for a custom helm cover to match, sanded the exterior teak, and painted the hull.  I still work full time but my schedule allows me to pass the boatyard each day so I can get 2-3 hours in (when the wife says its ok, of course).  Before I get into the details of the aforementioned, I guess it a good idea to list what still needs to be done before I take the Constance Marie off the "hard".
  • Repair a six inch stitch in my mainsail
  • Figure out why my in-hull tranducer stopped working at end of season last year
  • Figure out why my anchor light stopped working during the Down The Bay cruise last year
  • Commission the engine
  • Replace the head faucet as it is the original and it no longer capable of shutting off water supply
  • Replace the links that anchor the fiddle blocks to a stainless steel plate near the hatch
  • BUY a half-life Genoa (%$#&^%#!!!!) as head tore near the luff and can not be repaired
  • Replace teak moulding in galley
  • Compound polish the gelcoat then buff it up good.
  • Put the decal for my home port on the stern
  • Figure out why the dink is losing air
  • Commission my Yammy 4 stroke 2.5
  • Put the Magma propane stove back on the rear stanchion
  • ENOUGH ENOUGH ENOUGH, I JUST WANT TO GO SAILING!!!!!!


Saturday, April 11, 2015

April Showers Are Good, I Guess?


April is the month in our region when things at our Yacht Club's boatyard start hopping. Since January Mooring crews have been busy welding chains and replacing schackles.  Now they have near 100 to put back in the water.  Docks and Waterfront have repaired the floating docks and have positioned them at the loading and mooring docks.  The Burning of the Socks is this Saturday.  We usually turn out about 100 folks, with a Piper, and the ceremony starts at 1600 with the Blessing of the Fleet, then over to the shoreline for the Crossing of the Bar with Eight Bells to remember lost ones, next the flag raising by our Commodore and Vice-Commodore supported by a cannon salute and finally the reading of the Club's version of the Burning of the Socks followed by guess what....the burning of those stinking old socks....

"FOR IF THE WINDS ARE BELOW TWENTY AND THE TEMPERATURE IS ABOVE THIRTY, WE WILL DOFF OUR SHOES AND PEEL OUR SOCKS OH SO DIRTY".

It's been a busy three weeks since my last blog entry.  I finished putting in the final portals, painted the non-skid areas topside and sanded the teak floors in the galley and head.  I heard back from my sail master that the torn Genoa is not-repairable.  Well that means I have to confirm the I and J and go find me a 50%er.  No new sails here on a 35 year boat.  I will buy one that has 50% useful life left.

Figure 77
Out with the Old
Regarding the portals, after removing the inside screws, I went topside and removed the exterior screws.  I then took a hammer and two inch wide metal shim bar and worked my way around the portals outer frame until it pried loosed.  This exposed the caulking used to waterproof the spigot.  I used the knife on my Blacktip multi-tool to cut into the caulking to loosen the hold.   This may take about 10 minutes.  Once sufficiently loosened, I pushed the portal from inside and it fell onto the deck.  Using a very sharp 1" wood chisel, I removed all the caulking and silicone that remained on both the interior and exterior flat surfaces.  I then used my knife to run it along the opening's edge to remove any remaining caulking.  I then sanded it with 80 grit sandpaper and ensured that the spigot would be be able to retain new adhesive.  I cleaned all with acetone.
Figure 78
In with the New
You can see above that the way Mr. Cherubini designed the drain holes made it very easy with the replacement.  I did some research and being this is an old boat that flexes pretty good, I wanted to have the same dynamic with the portal.  Given my research on Hunterowners.com, I decided to use GE Silicone II and generously filled the spigots and lined the interior framework. I then replaced the screws and watched the ooze come forth as I seated the new portal.  I went topside and filled in the spigot from that side.  Generously applied silicone to the back of the exterior frame and adhered it to the portals face.  No screws necessary on this side.  Cleaned up all the ooze with a razor blade and paper towels.  Let dry and used the wood chisel to clean up the remaining silicon that had dried on the fiberglass and finished that off with some acetone.